This tutorial will cover how to create a basic BLE (Bluetooth Low Energy) central app on raspberry pi 3 using JavaFX (aka OpenJFX). I will be using Liberica JDK11 Embedded for this tutorial. With Gluon's commercial extensions and OpenJFX Monocle it is possible to run JavaFX app directly from console without X-Windows on raspberry pi (and it comes with all the bells and whistles of OpenGL ES 2.0 rendering without X-Windows). I will use Spring boot with Lombok to make things easier when it comes to packaging and logging configuration, but it is very much possible to do all of this as a vanilla JavaFX app.
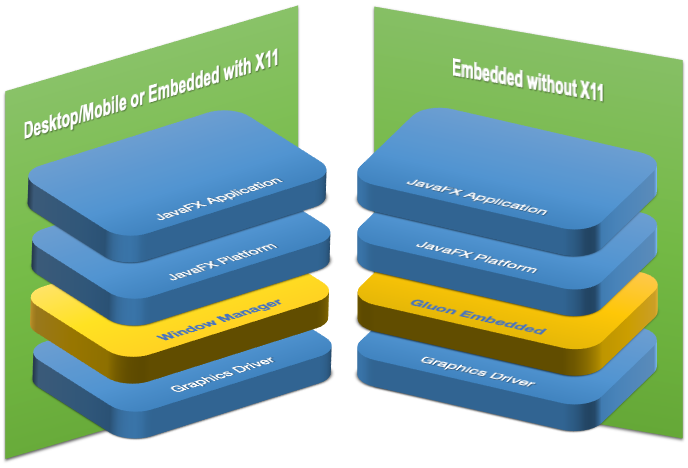 |
| Gluon Embedded Stack on the the right, in comparison with X11. [source] |
This post will not cover basics of any of the mentioned technologies. However there are some links to useful resources at the very end.
You can see a short demo of the application that I will cover in this tutorial here and checkout code for it here.
This application is a work in progress and I am mainly doing it as a hobby/learning and a possible conference talk. Making such a system using Java on an embedded(ish) device is for sure an overkill. There are more reliable (and possibly easier) ways to achieve the results. If you want a reliable hardware for Bluetooth enabled UI then I would recommend using any iPad from 2013 onward and create a basic Expo app with this library. If you are serious about development on MCUs I recommend going the route of Embedded C and UI tool kits like Qt on an RTOS (real time operating systems). Check out this demo from folks at Qt to see how quick their boot time is. Still this current recipe can be useful for learning about the intersection of BLE and JavaFX. It can also be used for prototyping and non critical applications (so don't use this to monitor a nuclear reactor)
Setup of OS/hardware
Hardware/OS
You will need following hardware.
Raspberry pi with bluetooth low energy chip or dongle (3, 4 or zero 2 w ; all of which come with BLE chip), SD card on which you have raspbian-2021-10* (aka bullseye) 64 bit lite image and a power supply.
- You could also use 32 bit OS if you never intend to to compile to native image using grralvm. As of now I could only find it possible to run Gluon on bullseye by manually enabling fkms.
A compatible touch screen or a regular screen and a pointing device (such as a mouse).
A bluetooth low energy device. I have programmed this for TI sensor tags , but you can use Nordic Thingy or LightBlue emulator on a compatible iOS/Android app.
Deployment
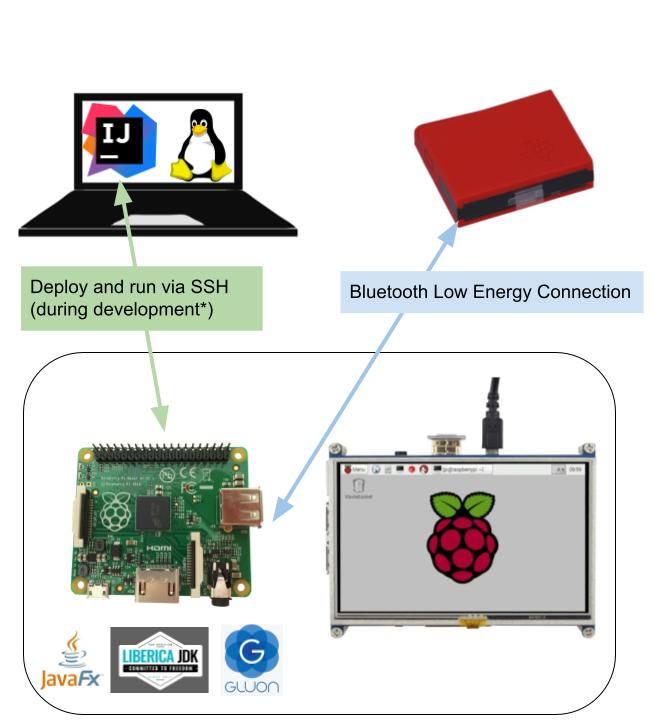
The following diagram shows at a very high level what our setup will be. We will use a Linux development machine (so we can eventually cross compile native graalvm image) and intellij idea. During development code will be deployed on raspberry pi which is on the same WiFi network. The bluetooth app that we are developing will be able to connect to sensor tag using some libraries that you will see later in the post.
Raspberry Pi setup (including bluetoothd)
Checkout relevant sections for configuring WiFi, enabling SSH in headless mode and configuring graphics card with raspi-config after you boot up. You can also check out this guide on Adafruit. Boot up your RPI and SSH into it. You will need to check its ip either from console using ip a or look at DHCP table of your WiFi router)
Once ssh works, make sure that bluetooth and hciuart services are running (i.e sudo systemctl status hciuart; sudo systemctl status bluetooth) and that your user (pi) is part of bluetooth group. (i.e sudo usermod -a -G bluetooth pi) . This should give your user access to the bluetooth stack, but if you run into any problems then check out this thread.
Test that bluetooth is working by starting bluetoothctl and doing a scan on). If you can not do that from your pi user you may need to reboot. But if you do get scan to work and if you have any BLE device in vicinity (like a smart watch or Tile) then you should see them popup. You can stop the scan with scan off and exit). If none of it works then you will need to debug why your board is not working. I suggest going to raspberry pi forums in that case.
Other Setup
Make sure that pi user can access /sys/class/input/mice/uevent following this post.
Make sure that you enable fkms (i.e you should have the line dtoverlay=vc4-fkms-v3d present in your /boot/config.txt file. Make sure you do that again after you install any TFT drivers as some times those drivers add/remove config lines.
Install JDK11 for embedded systems.
Lastly install gluon openjfx SDK (it comes with binary drivers). Also follow instructions for packages that are needed to use this SDK. If you are stuck try using ldd on shared libraries from the SDK to see which files are needed (i.e not found) and then search it using apt-file.
JavaFX application
Finally it's time to get to some Java code. I chose to use spring boot as the main entry component since I am very familiar with the framework and it is very versatile. But I will only be using it to make a jar file and to configure logging out of the box. We will be using Java 11 as that is the LTS version with Embedded JDK available to us. As for libraries, see the following list of dependencies for this tutorial.
Component Diagram
The kernel components used in this sample are already present on stock raspbian. And we already discussed about OpenJFX SDK and JDK and Spring/Lombok.
The star of this demo is the Blessed-Bluez library which makes it easy to deal with BLE logic (underneath it uses D-Bus which in turn talks to Bluez) .
For the GUI parts, the app talks to Gluon SDK which in turn talks to the touch screen drivers and the GPU.

Code walk trough
Now let's walk through the code. This is just a walk through and not a complete line by line commentary. You should check the code here
BlessedJavafxRpi3Application.java
First thing we see is the main Spring boot application entry point. Following this tutorial we create a spring boot application that launches JavaFX (line 8). We also implement the start method (line 17). This will start the application using FXML UI. Important bit to note here is the @Autowired injected controller on line 5. Next we go to the said controller's code.
SensorTagScannerController.java
Here we see that the controller initializes binding of all the FXML objects (using annotation , see line 6-28) , and properties (line 30-34) which can be changed based on events. We will discover BLE devices and put their address in a list (line 35) so we can connect to them , but for connection to work we need the full Peripheral object which we store in a map (line 36). Note that it is a ConcurrentHashMap since this map will be updated from callbacks .
We create a PeripheralCallback (line 40) which we will cover separately. Within the constructor of this class (line 46-54) we create a central manager (on line 53) using a central manager callback created just above it. CentralManager is fundamental to creating connections to peripherals. Centrals are what search for an initiate a BLE connection. As for the callback, we will discuss this class right after this class.
The methods onScanButton() and onDisconnect() are called from FXML.
Next we have two methods that are called from the UI (ie onScanBytton and onDisconnect) which sould selef explanatory, but tere is a catch here that we must run scan for 8-9 seconds (see more details in code comment) .
You may have noticed that this controller class is implementing an Initializable interface (see the reason here). The implementation of this interfaces sets up all the FXML bindings i.e what to show when (line 85-104) as well as code to trigger to connect() from list view (line 106-114)
After this we have some internal methods to connect and disconnect. See examples of blessed bluez here
CentralManagerCallback.java
This class is simple in the sense that it implements a predefined interface only. The only tricky bit is that once Bluez scanning starts, there is no grantee when it stops. So to make things understandable in the UI I have chosen to implements a BLEState enum and onDiscoveredPeripheral() (line 35-46) only adds to list of devices if it's not already there and if we are in a SCANNING mode.
Lines 15, 28 and 40 use Platform.runLater() to update the JavaFX UI (since this callback is in it's own thread)
PeripheralCallback.java
Rest of the code is straight forward as it is simply matter of implementing the interface. onCharacteristicUpdate method gets called every time there is data. We simply format it and set it to the right labels.
All the very hardware specific code (including calculateTemperature()) I have copied/adapted from this repo. In summary one has to setup the sensor tag upon connection (enable flags and set BLE notification intervals etc and then start getting notifications until the connection is severed.
Setting up IDE
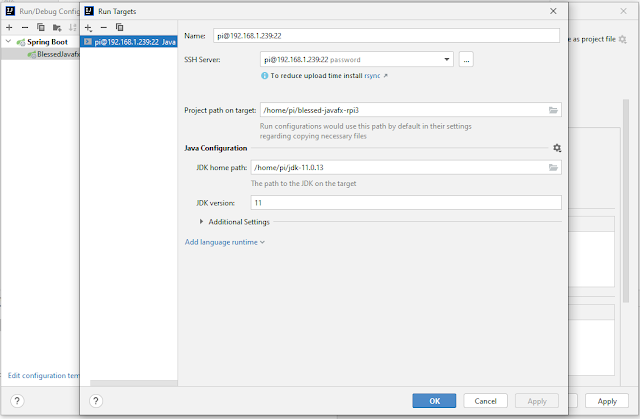
While running jar file directly is our final objective, we would like to setup our IDE in a way that we can quickly develop and deploy our application. Intellij has a great option for running and debugging code on raspberry pi. The only catch is that you have to be able to access SSH (which means network connectivity and firewalls should allow it). See the following screenshots to get an idea how to develop locally and run directly on raspberry pi.
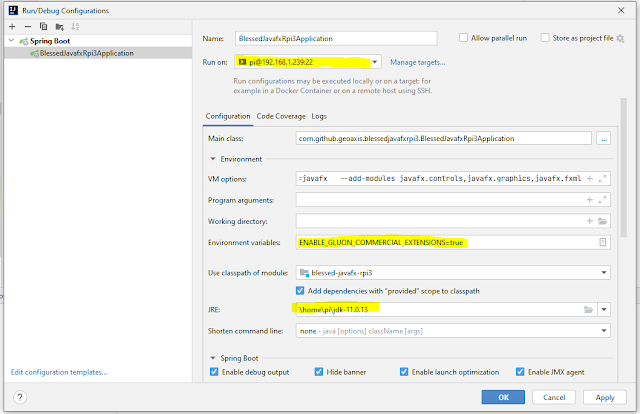
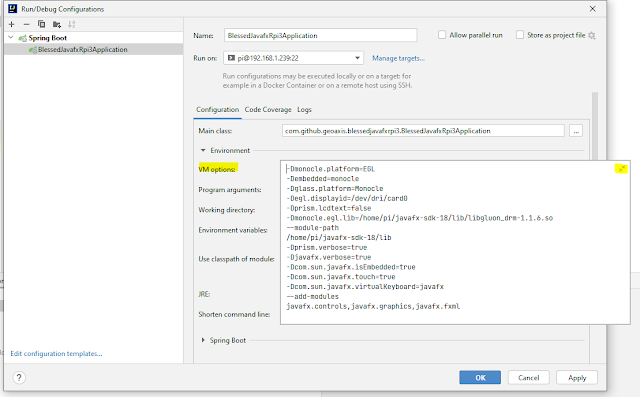
-Dmonocle.platform=EGL -Dembedded=monocle -Dglass.platform=Monocle -Degl.displayid=/dev/dri/card0 -Dprism.lcdtext=false -Dmonocle.egl.lib=/home/pi/javafx-sdk-18/lib/libgluon_drm-1.1.6.so --module-path /home/pi/javafx-sdk-18/lib -Dprism.verbose=true -Djavafx.verbose=true -Dcom.sun.javafx.isEmbedded=true -Dcom.sun.javafx.touch=true -Dcom.sun.javafx.virtualKeyboard=javafx --add-modules javafx.controls,javafx.graphics,javafx.fxml
Running locally on the pi
Ideas for future additions
A weather station with TilesFX and sensor tag sensors. This should be relatively easy with what we already have so far.
Making the app follow Java module system.
Movement Sensor and 3d visualization like this classic demo .This will be bit harder as one needs to learn about the 9axis movement sensor as well as how to present it in 3d using some mesh model. But its very much doable.
Going native with Graalvm and possibly making Gluon+Spring work together. This is currently a problem because BlessedBluez uses version of Dbus that can't be cross compiled. New version of Dbus-Java that will require Java 16+ could possibly fix that. But then Gluon team needs to update the Graalvm package to 17 as well.
Resources
The Definitive Guide to Modern Java Clients with JavaFX: Cross-Platform Mobile and Cloud Development 2nd Edition (amazon paper version released at end of Nov 2021 , oreillly e-book version already released)
Comments